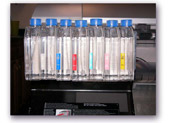
When your 'Long Life' bulk ink system arrives you
should have the following equipment - 8 bulk ink cartridges, vacuum
pump adapter, chip resetter and funnel as pictured in figure 1.0.
First filling of the bottles:
There are two philosophies about putting the bulk cartridges into
service.
| More information on our bulk
ink system is available as part of our total
solution sublimation package. |
One is to put the bulk cartridges into service, one at a time,
as the Epson cartridges run out. The other is the put all the bulk
in cartridges into the machine at once, saving the partially filled
Epson cartridges in case you need them at some time in the future.
Which ever way you choose, the preparation of the bulk cartridge
is the same. I just hold the cartridge under my arm, but some people
have made a little stand.
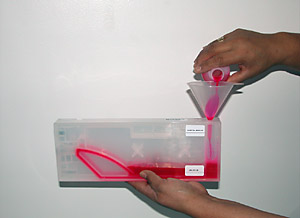
Take the cap of the bottle and fill with ink to where the neck
starts tapering to the cap. Replace the cap, but don’t snug
it down. About one turn back from tight is good. This is done because
even though the cap has holes in it, the holes don’t let enough
air into the bottles during heavy ink draw. When you refill the
bottles, adjust the caps this same way. Now we need to “pull”
ink into the cartridge using the vacuum pump included with the set.
Once you have done this the first time, you won’t need to
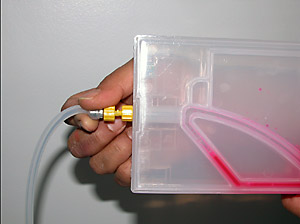
do this again, unless you let the bulk bottle run dry. The picture
below shows what the adapter fitting does when you insert it into
the cartridge.
The cartridge opening has a check valve in it to prevent
ink from running out of the cartridge (or from introducing air into
the cartridge) when the cartridge is not in the machine.
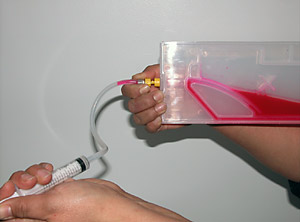
The vacuum pump adapter must be pushed into the cartridge
and held there while pumping the mechanism, until a small amount
of the ink appears in the little catch bottle in front of the pump.
(try it with everything dry first to decide if you need to make
a stand).
You could try to save that little bit of ink if you
want, but I find it to be too much of a hassle for the little bit
you get). I find that this procedure is easier to do near a sink,
since I dump the ink from the catch bottle after every cartridge.
You will also want a small glass of water to rinse out the small
amount of ink from the cartridge adapter between inks. This is because
there will always be a small amount of ink left in the tip of the
adapter after each cartridge, and you don’t want to contaminate
the next cartridge. (The amount of ink is so very small, some people
don’t worry, but I am kind of fussy). Push the adapter down
so the plunger tip is extended, and hold the tip below the water
level in the glass. Pump until the hose is clear to the catch bottle.
Remove the adapter from the water and release the spring. Unscrew
the catch bottle and dump it. After you rinse the hose and the catch
bottle, you are ready for the next cartridge. All you need to do
now is put the cartridge into the machine just like an Epson cartridge.
Refilling a Bulk bottle:
Your Epson printer keeps track of how much ink it
“thinks” is in the cartridge (whether an Epson cartridge
or bulk), by sending electrical information to a small memory chip
on the cartridge. When the machine “thinks” the cartridge
is “empty”, it stops printing and demands that a new
cartridge (with a “full tank” chip) be put into the
machine. With a bulk in system, we can put ink into the bottle anytime
we want, but we still need to “reset” it’s chip
so that the printer thinks it is a new (“full”) cartridge,
or it will stop running. Don’t use the ink indicator on the
printer control panel or in the software to decide when to add ink,
just look at each bottle . Even though the ink coats the bottle
it is still easy to see the level. When the ink level is down to
about 1” or so, you will need to add ink (we don’t want
to suck air and have to go through the start up procedure again).
Some people like to refill the tanks in the machine, others like
to remove them. But what you must understand is that the cartridges
have a unique “auto reset” chip that will reset itself
to “full” whenever the cartridge lever his opened and
closed, so if you decide to refill the cartridge in the machine,
you still must open and close the cartridge lock lever to reset
the cartridge chip.
You must also realize that opening and closing the
cartridge lock lever will reset ALL the chips to “full”.
What you need to realize is that you cannot start trusting the level
indicators on the machine or the software, because ALL the chips
get reset to “full” whenever any cartridge is removed
and replaced. YOU CAN”T TRUST THE PRINTER OR SOFTWARE INDICATORS-
YOU MUST WATCH THE BOTTLE LEVELS.
Occasionally a bottle will fail to reset properly.
You can tell this has happened, if after refilling a bottle, all
the indicators on the machine do not return to full. This happens
because the chips are like any computer memory chips and can also
be subject to static charges- Occasionally, a chip on a cartridge
will get “zapped” and not reset properly. So after you
have replaced the cartridge after refilling- check and make sure
that it’s level indicator on the machine does indicate that
the cartridge you refilled (as well as all the other cartridges)
are full.
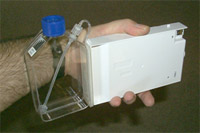
If they aren’t, we have provided a Chip Resetter to reset
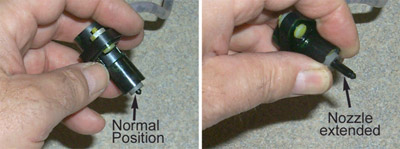
a “zapped” chip to full status. Remove the cartridge
from the machine and hold it like pictured.
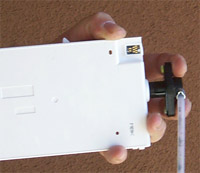
The chip resetter has got a machined fitting that will match the
pins with the gold contacts on the cartridge. The pins are spring
loaded to insure proper contact, so you will need to push it into
the cartridge to insure good contact.
Press the little black button and watch the blinking light. Nice
slow blinks at about a one second rate means good contact was made.
If you get a rapid flash- wait until it stops and try again. That’s
all there is to resetting a “zapped” chip. Some people
prefer to manually reset the chips using the chip resetter all the
time- your choice.
Instructions for Priming a
Cartridge (Epson 7800/9800)
|